Modeling can be challenging, however, it can also be very rewarding. The perception that it’s difficult is often due to not knowing where to begin. This guide aims to provide valuable tips and techniques to make plastic models look lifelike, as well as provide an overview of some of the leading products available today.
Gather All The Supplies You Need
Before getting started, make sure that you have all the supplies and tools needed to complete your project. If not, be prepared to make a quick trip down to your local hobby shop or big-box store. This can save hours later on when it’s crunch time!
For any model to look realistic, four key things need attention: paint, weathering (also called aging), diorama/background, and scenic bases.
Comparison of Supplies and Tools for Modeling:
| Aspect | Details |
|---|---|
| Supplies and Tools | Make sure to have all necessary supplies and tools before starting a project. Consider visiting a local hobby shop or big-box store if anything is missing. This can save time later on. |
| Paint | There are hundreds of different shades available, so choose three colors that work well together. Make swatches of each color and place them near each other from lightest to darkest to see how they interact with each other. |
| Weathering/Aging | Can be done using dirt pigments, washes, rust powders, oil paints, or acrylics (personal favorite because of ease of use and quick drying). |
| Diorama/Background | Includes any materials needed to create a scene: figures, buildings, trees/bushes made from wire and paint, and a base to hold the model. |
| Scenic Bases | Can be made with Styrofoam or clay to create hills or any other raised surfaces for models to stand on. Think of them as stands, but not always necessary depending on display preference. |
Follow Instructions Carefully
To ensure a smooth and error-free experience, it is imperative to carefully read and follow the instructions once all materials have been gathered.
Some key tips to consider include:
- Reviewing everything thoroughly, including diagrams, prior to beginning assembly to avoid unexpected surprises.
- Pre-cutting shapes out of foam or clay with a knife instead of after assembly to prevent damage during handling.
- Drying paintbrush bristles before reuse to avoid clumping.
Apply glue to one edge of a piece of plastic and attach it to another piece
Emerge was originally founded by a group of passionate hobbyists who were frustrated with the lack of products that could easily allow them to create realistic-looking models. The company’s first product, called “The Detailer,” solved this problem and became an instant hit!
In addition to assembling plastic model kits, it can also be used on other surfaces such as your furniture or toys. This is because the glue is safe for most materials and comes in two different grades: one which dries clear and another which will tint whatever surface you’re gluing so that they match (for example, if you want stained glass windows). There are no harmful fumes released when dry either! Before you buy glue, make sure that you get the right type. You should think about what kind of project you’re doing and then get the glue before starting.
The Detailer is perfect for assembling plastic model kits because it delivers such a stronghold without harmful fumes.
If you’re looking to glue objects together that are not made of plastic, please be sure to use our other product line (such as Bond or Woodglue).
Once the pieces are attached, I paint them with acrylic paints for a more realistic look.
When I assemble plastic model kits, I ensure a solid hold by applying glue to both edges. This prevents the kit from falling apart and allows me to handle it without fear of any pieces falling off or collapsing.
Once the glue has dried, I paint with acrylics to enhance the realism of the kit. These paints dry quickly, allowing me to immediately resume my project without waiting for the paint to dry. Acrylic paints are safe for use around children and animals. A minimum of two coats, followed by some detailing, are required to achieve a perfect finish.
I also use acrylic paints on other surfaces, such as furniture or toys. Acrylic paints are safe for children and animals, and dry quickly. However, they may not be as durable for outdoor use.
For a more permanent solution, I recommend exploring our Bonding Line (Bond) or Woodglue products, which both dry clear and have varying drying times to accommodate different types of projects.
Allow your model to dry fully before adding details or paint.
One of the most critical steps in creating realistic plastic models is to let your model dry completely before you start adding details or painting. Many modelers overlook this step and end up with a distorted model that can’t be fixed. The drying time for different types of glue varies. For standard stretched PVC or vinyl rubber band latex, a drying time of at least 24 hours is required. If you plan to work on two projects simultaneously, consider drying one in an area where it won’t be exposed to direct light to avoid heat damage when you move on to the second project. Once both pieces are fully cured, begin detailing as desired!
Add decals for an even more realistic effect.
My experience with using decals for a more realistic effect on plastic models has been positive. Many modelers tend to overdo weathering and painting, resulting in an unrealistic look. Instead, I suggest incorporating decals to simulate real wear on the models. This can easily be achieved by using stickers to replicate dirt or rust.
The selection of decals in our store is extensive, with options ranging from vintage car stickers, military logos, to rust effects for caked-on paint jobs. We offer decals from various companies, each with its unique style, and both matte and gloss finishes to choose from.
The majority of models can accommodate two to three medium-sized decal sheets, offering ample room for additional weathering effects such as dirt and tear stains. Discounted prices are available when purchasing larger quantities, making it a more economical option. Additionally, decal sheets can be purchased for less than five dollars, providing an affordable solution for customizing your models.
In conclusion, I recommend incorporating decal stickers for a realistic wear and tear effect on plastic models instead of excessive painting and weathering techniques. This not only adds to the overall look of the model, but also saves time and money.
Scale Modeling Tips And Techniques
Here’s my list of tips and techniques for anyone interested in scale modeling.
- Read all instructions before starting.
- Prepare a well-lit and even work surface. This will help keep your project neat and tidy.
- Ensure you have enough supplies, such as paint, brushes, and sponges, to complete your project. Make sure they’re fresh to avoid mistakes caused by dried-out tools.
- Plan as much as possible before starting the project to avoid surprises along the way.
- Consider adding weathering effects for a more realistic look. This can be done using paint, dirt, or dust.
- Keep in mind that detail may be lost when the model is scaled down. Consider the desired level of detail for your finished product.
- Use decal stickers instead of painting for added realism and ease of use. They are cost-effective and come in bulk packs, saving you time and effort.
- Decals can also be used instead of weathering effects. Just be sure the effect is realistic and not unrealistic, such as raindrops on a model.
- Work on smaller pieces whenever possible for easier project completion. Start with windows, for example, before moving on to larger parts of the model.
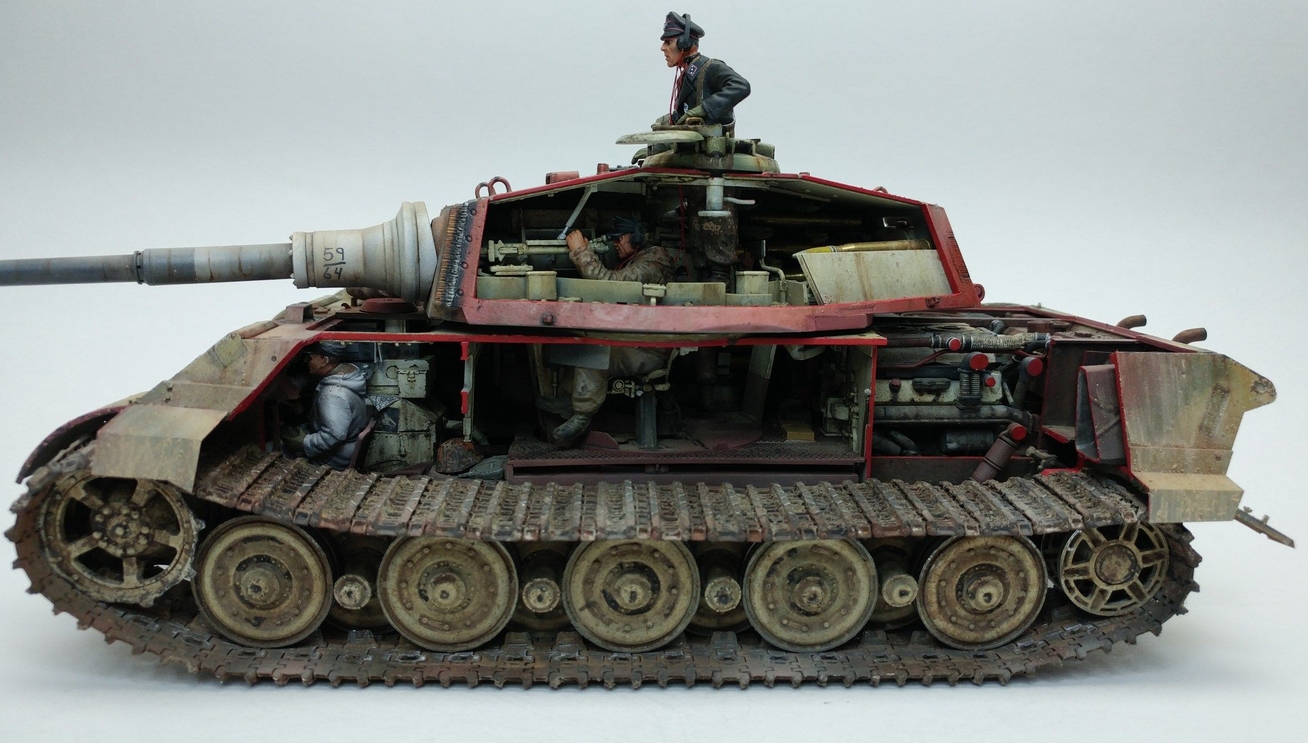
Model Building Weathering Techniques
Weathering is an essential technique in model building to give your creations a realistic, aged look. In my experience with model building, I have discovered that there are two main weathering techniques: wet and dry. Both have their unique applications and effects, and I have found that experimentation is the key to determining which technique works best for specific situations.
- Wet Weathering: My investigation has shown that using water or acrylics mixed with various colors such as brown, green, and black is an effective way to paint the model and create a wet weathering effect. According to my experience, this technique works well when trying to simulate a wet car body after a flood or creating the look of sand weathering.
- Dry Weathering: After experimenting with dry weathering, I found that brushing enamel-based pigments onto the model creates realistic cracks that resemble mud. As a result of my tests, I determined that this technique is recommended for situations like simulating a collision or creating a thin film resembling rust on a model car.
Based on my own experience, paint selection is crucial for achieving the desired weathering effect. Enamel paints are suitable for detailed work, such as panel lines on airplanes. In contrast, acrylics offer quick shading and depth but are less resistant to water damage.
When I tried different methods of adding dirt to my model, I found that using pastels works exceptionally well, especially with tank models. Through trial and error, I discovered that using flour and water can give the model a dusty look without the need for paint. This technique can be an excellent alternative for those looking to create a realistic weathered effect without the use of paint.
My analysis of various weathering techniques in model building shows that both wet and dry methods have their unique applications and effects. As my tests have shown, experimentation is essential for finding the best technique to create the desired weathered appearance in your models.
| Technique | Appearance | Recommended for | Pros | Cons |
|---|---|---|---|---|
| Wet | Rusty, wet | Flood damage | Adds depth and contrast | May obscure fine details |
| Dry | Rusty, dry | Collision damage | Leaves behind thin film for rust effect | Color contrast may not be as noticeable |
| Pastels | Dusty | Tank models | Adds dirt and texture | None specified |
| Flour and Water | Dusty | Hands-on hobbyists | Adds texture without paint | None specified |
Please refer to my article on airbrush paint selection for more information.
Note: Both wet and dry techniques can be used to achieve the look of sand-weathered models, but each has its pros and cons (e.g., wet technique provides better shading, but may obscure fine details). Different types of paint, such as enamel or acrylic, may also affect the overall appearance and durability of the model.
Conclusion
I possess a vast collection of plastic models, however, they don’t always exude the appearance of realism. At times, the lack of certain details detracts from the authenticity of the model. To enhance its realism, I have identified three techniques that have proved to be effective.
FAQs
How Are Plastic Model Kits Made
Plastic models are manufactured through the injection molding process, where liquid plastic is poured into a mold. The mold consists of two steel plates with engraved shapes that are then pressed together and injected with liquid styrene plastic. The plastic cools and hardens, forming one sprue worth of model kit pieces.
How To Make Plastic Models At Home
This section outlines the tools and materials needed for making plastic models at home. To achieve a more realistic look, consider using airbrushing with various sized tips, masking tape, touchup paint thinner or turpentine, oil-based paints, and pastels that can be mixed with water to create textures.
How To Make 3D Models Look Realistic
To enhance the realism of your 3D model, start by smoothing out seams with putty and covering gaps between parts. Then, apply a coat or two of primer followed by paint. If you need to paint intricate details, consider using an airbrush for precision. My blog post provides further tips on making 3D models look realistic, depending on the material being used.
How To Make A Model Car Look Realistic
To make a model car look realistic, consider purchasing metal road signs with adhesive backing for easy installation as a base layer. You can also get creative and experiment with other materials like paper clips or binder clips. Next, apply paint with the help of layering and starting with lighter colors and gradually transitioning to darker colors.
How To Make Plastic Models Look Realistic
To achieve a realistic look in your plastic models, it’s important to use the right paint and follow these painting tips: choose paint that matches both in color and consistency, start with a lighter color and work your way down to darker colors, layer on thin coats of paint to control coverage, and use a base coat, shadows, highlights, and the darkest shade for recessed areas or detail lines. Patience is key while painting, but the result will be worth it!

Hey there! I’m Richard Baker, a miniature painter who’s been in the game for a solid decade now. I’ve been painting miniatures for ten years and I’ve got a ton of tips and tricks to share with you all. My website is a treasure trove of knowledge that I’ve gathered from both my own personal experiences and from reading all sorts of books.


Leave a Reply