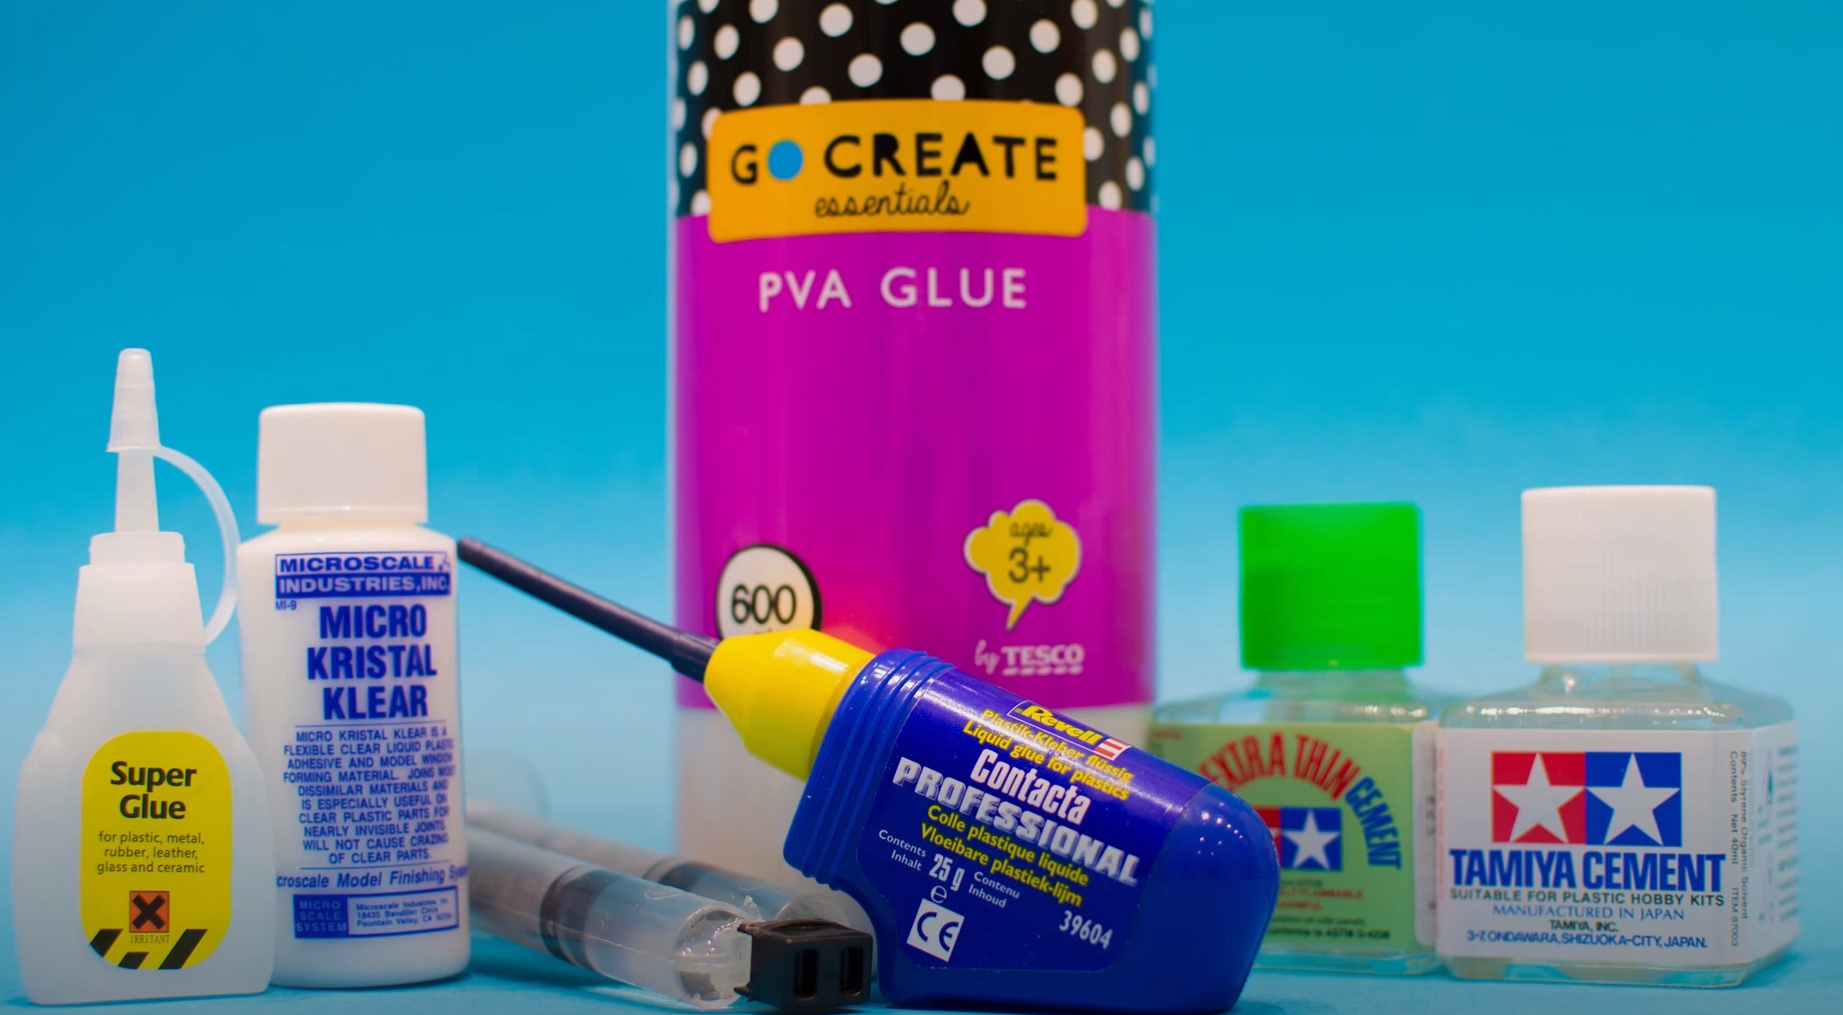
It’s never too late to start a hobby, and one of the best hobbies for adults is scale modeling. Scale models are figures made to resemble real objects at a reduced size. Most people who enjoy building scale models use glue because it is the most convenient way to attach parts securely. If you’re unsure what type of glue works best for your project, this article will help you find out which adhesive is right for your needs!
Different types of glue – what are their pros and cons?
The type of glue that you use will depend on the project. Glues come in many varieties with different properties and advantages for each one, so it’s hard to say which is best. Here are some considerations when choosing a glue:
- Single vs. double-sided gluing – Single-sided gluing means that only one side of the parts is glued together while the other surfaces maintain their original appearance. Double-sided gluing involves both sides being covered with glue before they are assembled into place; this can sometimes result in more detailed work though single layer options may be simpler to remove later if desired.
- Brittleness or flexibility – Clear adhesive often breaks down over time, and since most precision modeling pieces need to last indefinitely, these types of glues are not a good option. Non-clear adhesive types seem to be more effective at holding pieces together.
- Transparent vs. opaque – Most people prefer transparent glue because it doesn’t darken the surface that’s being glued, but some may want an opaque type depending on what they’re trying to build or how much detail work is required.
- Temperature tolerance – Some adhesives don’t do well in high heat environments and will break down over time if exposed too often; this can cause issues when working with hot glue guns and other tools as most clear glues have temperature problems when used for these purposes.
- Type of plastic material – Different plastics react differently to different types of glues, so make sure you read up on the properties and limitations of what you’re using
- The type of project – Different types of glue work best for different projects; if you’re making a multi-piece model, use double-sided glues to increase stability. If your project is small or requires detailed work, the clear adhesive might be preferred.
What’s the right kind of glue for me? It depends on how much experience you have with scale modeling and which materials are used in your project. For instance, most people who build models from wood prefer epoxy resin because it bonds well when exposed to moisture. Other people may like contact cement that adheres better than adhesives can due to their strong bonding abilities. This article will cover some common types of glue and the best uses for them.
If you’re not sure what type of glue is right for your project, start by thinking about the following:
- What shape are your models? Is there any water exposure involved in assembling them?
- How much time do you have to spend working on this project? If it’s just one or two minutes, white glue might be best because it dries quickly, so you’ll save some time! But if you need something stronger yet quick-drying as well, liquid nails could be perfect.
- Do I want my model pieces to stay together permanently after assembly? Permanent adhesives such as epoxy resin would help prevent possible separation.
- Do I need glue that dries quickly? White glue is perfect if you don’t have time to wait for other adhesives because it only takes three minutes!
How to use glue on models, including the best ways to apply it
If you’re not sure what type is best for your project, this article covers various types and their main uses:
- White glue – This clear adhesive dries quickly, which may come in handy when working with hot tools like glue guns; however, it doesn’t hold together well over time
- Contact cement – These glues don’t need to dry first before application which can save lots of time depending on the size of your project or whether dry patches are an issue
- Liquid nails – The name isn’t very informative, but these adhesives are easy-to-use as long as there aren’t any air bubbles; they’re also a good option for projects that require lasting adhesion
- Phenolic resin – This type of glue is perfect if your model needs to last indefinitely
When you put glue on something, it is not as strong. It would help if you avoided clear glue because it is not strong and dries slowly. If you’re unsure what kind of glue would work best for your project, make sure to consider the following: any shape models will have (whether there’ll be water exposure), how much time you have available for working with this project, whether you want permanent pieces after assembly and/or need something quick-drying. The more experience you have with models, the easier this process will become, and you’ll be able to decide what type of glue is best confidently.
Tips for using glue effectively
- Use glue with care – It’s important to know what type of glue you’re using and how it works. For instance, some types are toxic, like contact cement or liquid nails; make sure not to touch your skin after applying them (or wash hands thoroughly). Other types may be more difficult to work with, so make sure you first read the instructions.
- Wear gloves – If you’re using a type of glue that isn’t compatible with the skin, it’s important to wear gloves and remember not to touch any part of your body after use since the adhesive may stick!
Be sure to read instructions carefully – It’s vital for safety reasons and knowing how long each type takes before drying so you can plan accordingly; also, look out for types that require special tools.
- Avoid alcohol-based glues – Alcohol is toxic and should never contact food items or anything else edible.
- Wait until the item has fully dried before adding another material on top if possible (e.g., painting) because some adhesives might react poorly due to moisture
- Don’t use glue on porous surfaces – Some types of adhesives react poorly to these materials and may leave stains or be difficult to remove. If you’re not sure, try testing a small area first.
If the item lasts longer than a day, you can add something like an acrylic sealant that will prevent water from getting in; this step is necessary if using epoxy resin systems that require time for curing.
This helps when remembering what type of glue works best per project without going through all the information again. Most glues are safe, but there are some precautions, such as wearing gloves if needed.
Tips on using a wet brush to apply the glue
- Make sure to use a wet brush with glue – This is especially important for air-drying glues so the bristles can get into those hard-to-reach spots. When working with white glue, you’ll need an even thinner coat of adhesive; this way; any showing parts will dry quickly.
- Be careful not to overbrush, or else there might be too many small drips which could lead to messes and peeling later on.
- Allow extra time if using phenolic resin because it takes much longer before drying than other types of adhesives.
- When applying contact cement, make sure all surfaces are coated evenly; otherwise, bubbles may form when dried and cause issues in future steps. It’s also important to wait the appropriate time before adding any other materials on top.
- Be careful about using epoxy resin in conjunction with non-epoxy glue because the two types react poorly.
- If you’re trying to get an edge or junction of pieces, use a putty knife for smoother and cleaner results. This helps avoid cracks later on as well as being able to make adjustments after application.
- Keep your projects organized – Place clamps where they’ll be necessary so that there’s less movement during assembly; this is especially important if working with epoxies since those require plenty of time before curing (e.g., 24 hours)
- The wet brush technique can be used for white glue, but it won’t dry quickly like some other adhesives. For phenolic resin, make sure that you don’t know the overbrush and evenly apply it to both surfaces. Some glues react when used with different adhesives, so it’s important to be aware and test before applying anything on top.
Important things to remember when working with scale model glue
- Be sure to read instructions carefully – It’s vital for safety reasons as well as knowing how long each type takes before drying so you can plan accordingly; also, look out for types that require special tools
- Avoid alcohol-based glues – Alcohol is toxic and should never come in contact with food items or anything else edible
- Wait until the item has fully dried before adding another material on top if possible (e.g., painting) because some adhesives might react poorly due to moisture
- Don’t use glue on porous surfaces – Some types of adhesives react poorly to these materials and may leave stains or be difficult to remove. If you’re not sure, try testing a small area first
- If the item is going to last longer than a day, you can add something like an acrylic sealant which will prevent water from getting in; this step is necessary if using epoxy resin systems that require time for curing
- This helps when remembering what type of glue works best per project without going through all the information again. Most glues are safe, but there are some precautions, such as wearing gloves if needed.
- Be careful about using epoxy resin in conjunction with non-epoxy glue; the two types react poorly.
- Keep your projects organized – Place clamps where they’ll be necessary so that there’s less movement during assembly; this is especially important if working with epoxies since those require plenty of time before curing (e.g., 24 hours)
- The wet brush technique can be used for white glue, but it won’t dry quickly like some other adhesives. Phenolic resin is a type of paint that you put on both sides of something. You want to make sure that you coat the surface evenly and not use too much overbrush.
The best way to store your glue bottles, so you don’t have any accidents with them leaking or drying out in storage
This is a perfect tip for storing any of your modeling glues. When you are done using the glue on your model, please put it back in its original bottle and seal it with clear packaging tape around the top to keep it from drying out or leaking when not in use. This will also ensure that if someone else uses one of these bottles again, they know what kind of product was inside them too!
We have a nice little package where nothing can leak or dry up because our lid/cap is sealed tight. Once all the bottles are sealed this way, store them upright so they don’t topple over like before (or lay flat) to sit safely until next time!
Oops, I forgot to mention that you should also label the outside of your bottles if they are not already labeled on the inside. You can use a marker or some stickers, for example, and then store them in an old shoebox at home (or wherever), so it’s easy to find when needed next. Just be sure there is enough room around each bottle, so nothing tumbles out and breaks because the boxes get moved around a lot sometimes. This way, we know what kind of glue goes with which project, too, without having to open all those containers up every time again 😉
Don’t have any clear packaging tape? No worries! Use masking tape instead since it does its job just as well but doesn’t leave any sticky residue behind.
Things you should know about using different kinds of glue with your models
- White glue is stronger than superglue but weaker than epoxy.
- Epoxy takes a while to set, so you sometimes need it when using them for larger parts or projects.
- Superglue is good for small, quick fixes. It’s also a great way to put together parts that won’t be visible on the finished model.
- Liquid glue or paint can work in some circumstances as an alternative to epoxy and superglue – though it isn’t recommended because of these drawbacks:
- PVA glue (sometimes called school glue) is another option if you’re looking to use something cheaper; remember that PVA has lower water resistance and dries out faster than epoxy!
- Super glue can be tricky to use for scale modeling because it’s susceptible to air bubbles.
- Epoxy comes in various colors, and some brands have extended drying times, so you don’t need to worry about rushing through the process if you’re using epoxy instead of superglue.
You should always try out your new kind of glue on scrap pieces first before working with it on any parts needed for your model – this is especially true when it comes to white or yellow glues!
Most hobbyists know that they can find all sorts of different types and thicknesses of glue at their local craft store: not only white glue but also liquid adhesive, PVA (sometimes called school)
The difference between white and yellow glues (and which one you should buy)
Key Points:
- White Glue is stronger than superglue but weaker than epoxy. White glue also takes a while to set, so make sure you have some time on hand when working on larger projects or parts. They are good for quick fixes, too, though, as they dry faster than other kinds of glues.
- Yellow Glues are usually made from PVA, making them cheaper (but not as strong) than white glue. If you are not concerned with functionality, yellow might work better than white because it can stay cleaner longer.
Scale modeling glue can be a tricky thing to work with. There are many different types of glue, and each one has its own unique benefits for your models. I hope our guide on the best ways to use scale model glues will help you make an informed decision about which kind is right for you.
Conclusion
Scale modeling glue can be a tricky thing to work with. There are many different types of glue, and each one has its own unique benefits for your models. I hope our guide on the best ways to use scale model glues will help you make an informed decision about which kind is right for you.

Hey there! I’m Richard Baker, a miniature painter who’s been in the game for a solid decade now. I’ve been painting miniatures for ten years and I’ve got a ton of tips and tricks to share with you all. My website is a treasure trove of knowledge that I’ve gathered from both my own personal experiences and from reading all sorts of books.


Leave a Reply