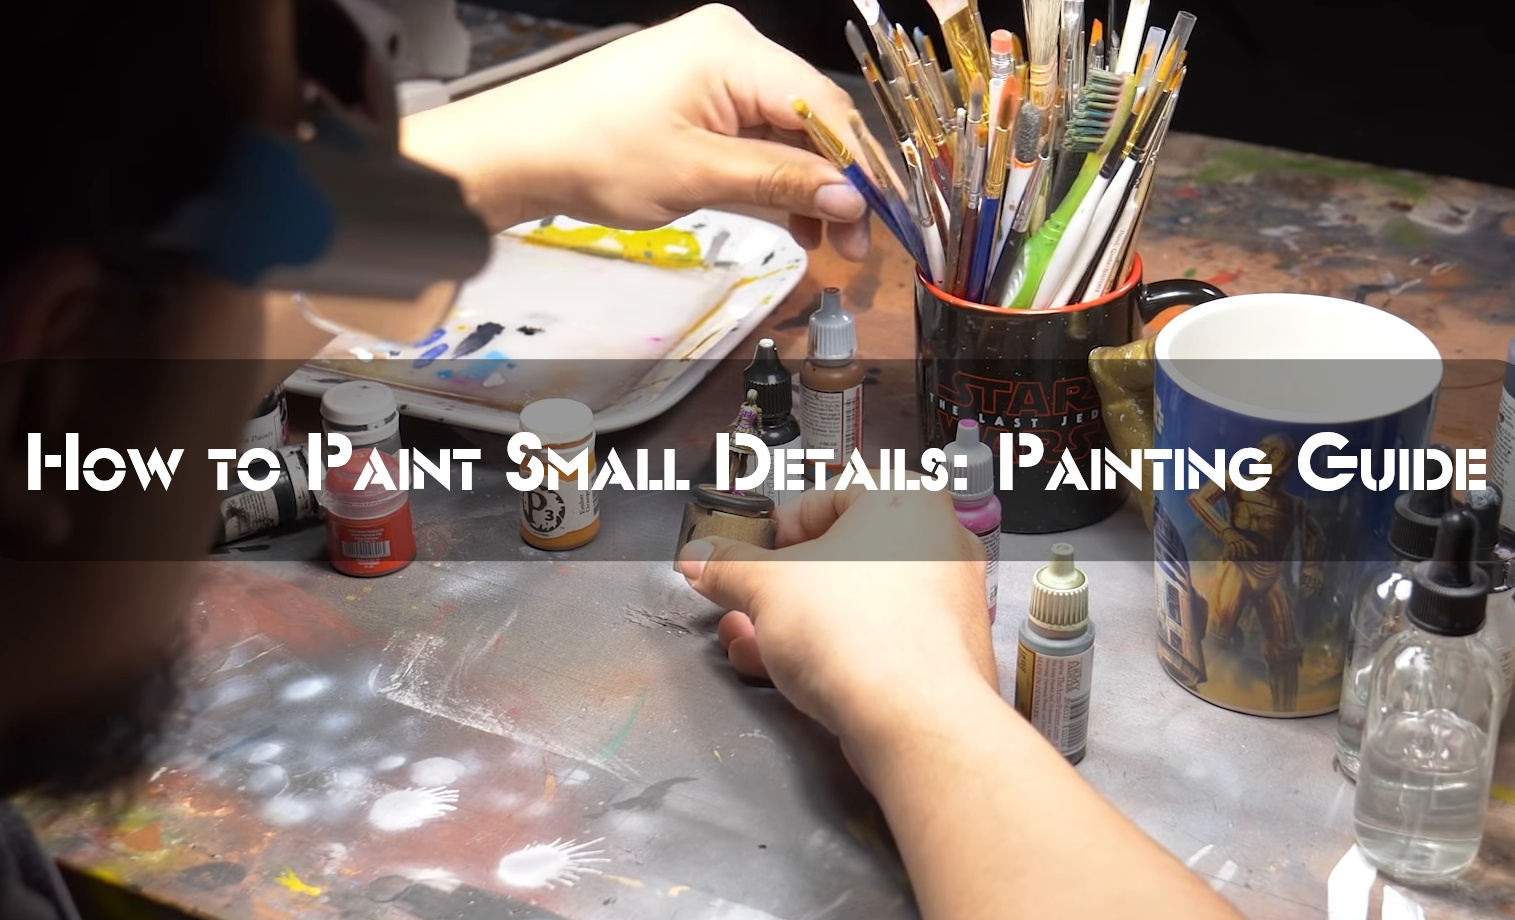
Hey there fellow painters! Today, we’re going to dive into the world of painting small details and how to make them pop. Trust me, I know it can be a challenge, but with a little bit of practice and the right tools, you’ll be a pro in no time!
So, let me share a personal anecdote with you. I used to struggle with painting small details, especially when it came to miniatures. I would always end up with a blurry mess, but then I discovered the magic of using a good brush and taking my time. And let me tell you, it made all the difference in the world.
Now, I’m not saying you need to spend hours on end practicing, but it’s important to put in the effort if you want to get better. And let’s be real, who doesn’t want to impress their friends with their mini painting skills?
One thing I’ve found helpful is incorporating humor into my painting process. For example, I like to imagine my miniatures as characters in their own little world and give them funny personalities. It makes the process more enjoyable and allows me to get into the right mindset for painting those tiny details.
But don’t just take my word for it, try it out for yourself! And remember, the key to painting small details is patience and control. Take deep breaths and try to feel the emotion of the piece you’re creating. Trust me, it’ll show in your work.
How to Improve Painting Details on Miniatures
So you want to paint tiny details on a model? Whether it be the eyeballs of your bust or hand-paint a historical wargaming figure, e.g., tank and infantryman. Well, good for you! This will require some fine brushwork skills, but don’t worry because I can help with that.
What’s the Best Way to Paint Really Small Parts on Miniatures?
The best piece of advice for how to paint tiny details on miniatures better is that it’s worth investing time into doing! So go ahead, practice your craft by actively challenging yourself with models like gemstones and eye sockets. There are lots out there in the world waiting for someone who can meet their challenge – don’t be afraid or embarrassed about these sorts of games; they’re good training wheels when learning something new anyway.
When you invest in something, whether it be time or money – expect a return. There are many ways of doing this, and one way is through art! Your brain will never waste its resources. When investing energy into anything creative like painting or sculpture, they need all they can get before moving onto other projects because there isn’t enough left over for sleep (but who knows what else needs those few hours?).
The bottom line is if you want to improve in this hobby–you need to put down the paintbrush and get your hands dirty. You can’t learn how to take on a project like painting miniatures without actually doing it!
Painting details miniatures can be tricky, but I’ve got your back with these easy-to-use tips. After reading this article, I hope that you will better understand how to create the details for any miniature and paint them in such a way so they don’t look too rough or unfinished!
The actual goal of this article is to help you paint tiny details on your miniatures and models.
Here are 5 Simple Steps for Improving Your Miniature Detail Painting
- Maintain a good body posture at all times.
- Take breaks from painting to rejuvenate your creative energies.
- Use a bigger brush.
- Thin your paints (but not too much) for a cleaner look.
- Use a dry color palette
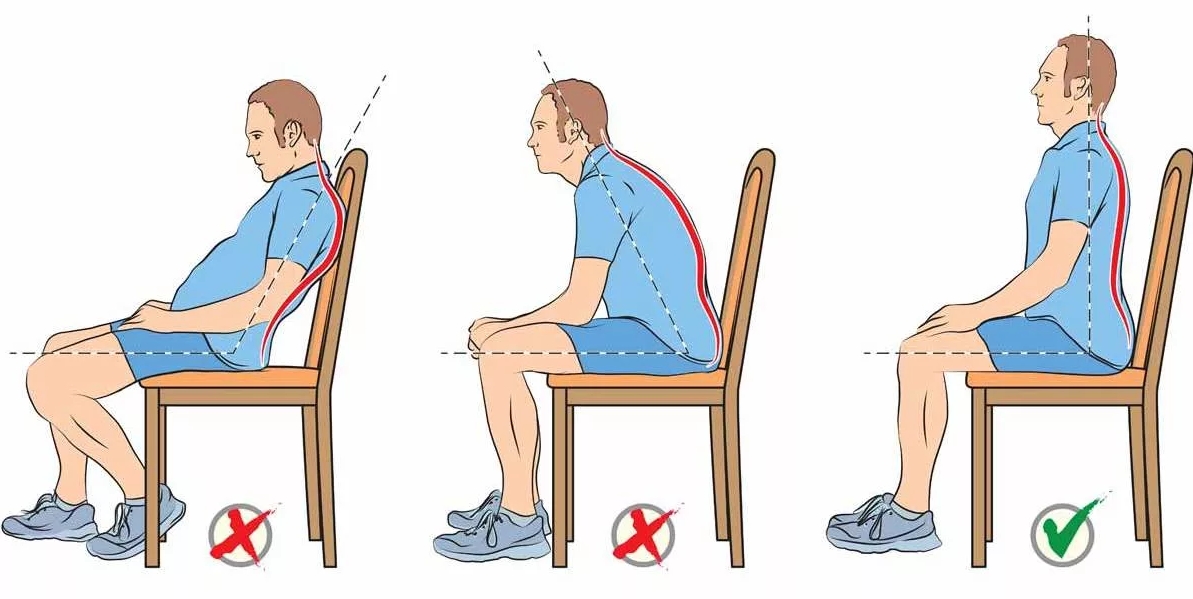
Step 1: Maintain a Good Body Posture at All Times
Straightening your back will improve the way you paint details. If it isn’t aligned, then every part of your body is not working optimally for hand use, and painting can be difficult or impossible with poor posture!
It’s not just your hands that need to be in shape for the job of painting. The whole body does too! You see, when you paint accurately and with precision, it takes more than just technique; posture is key as well, so adjust accordingly throughout every session – whether it’s sitting down at home or working on location…
People with physical disabilities often struggle to balance themselves during daily activities due to their chairs being too high off ground level, which makes them unstable and unable to properly do their job. Instead, these people should invest in a footrest stool for extra height and stability when standing up!
You can always learn to stretch your neck and straighten up, but if the office chair is too low or high, it could cause back pain. A curved lower lumbar becomes uncomfortable while sitting for long periods, which means you’ll eventually feel discomfort at some point during any given task – this would be worse than having appropriate height, so keep an eye out!
It is possible to paint standing up, but you’ll need an expensive desk.

The POXURIO electric standing desk is an excellent choice for anyone who wants to achieve a healthy and happy lifestyle. This adjustable standing desk with storage offers smooth height adjustment and memorizable settings, so you can switch from sitting to standing whenever you please! The under-desk drawer provides space for storing things that are no longer need such as pens or documents. The memory controller (along with three preset options) lets you easily recall your favorite desktop levels quickly and effortlessly- perfect for the ever-changing work atmosphere!
The idea of a standing desk for painting miniatures is intriguing, but they can be expensive. Most people don’t like how it could potentially tip bottles or pots when moved from one location to another, and that’s why I’m still exploring the option instead!
A standing desk is an excellent investment for anyone in the art-and creative fields for people who can afford it.
What you can do to improve your body posture for painting miniatures right now
- The more you move your model up, the easier it will be for her. Keep in mind that if possible, try aligning yourself back and head, so they’re on one line with each other while modeling!
- Remember to stretch your shoulders and keep them relaxed. You shouldn’t feel any tension on the side neck; either forward or backward slouching poses can cause this!
- When you paint miniatures, don’t just stay in one position for too long. Shift your weight around and let different muscle groups relax with every movement!
- Many people like to cross their legs when sitting on the ground, but this can be harmful to your spine. Keep both feet planted to reduce pressure off of it and improve blood circulation!

One of our most versatile magnifying glasses, with five different magnification levels (1.0X, 1.5X, 2.0X, 2.5X, 3.5X), so you can find the perfect one for any situation! You can even customize it by removing and installing scratch-resistant lenses on something that quickly charges over USB – there’s no need to worry about batteries! It is excellent for professional use or everyday home use since it is versatile in being worn in several ways. For example, directly on your face or with eyeglass frames explicitly made for close work! This new model also features rubber nose pads that will lighten the load while you complete some heavy lifting at your desk this holiday season.
Step 2: Take Painting Breaks
I know that I can be hooked on painting for hours at a time, but when my body is tired, it’s harder to keep up. So instead of trying to paint quickly in one long session like before- try breaking up your sessions into shorter spurts with some breaks between them. This will help give you mental endurance as well, so no disasters happen while doing detailed work!
For me, the five-minute break in between sessions is essential. It gives my mind and body time to recharge from working so intensely; then it’s back into painting mode for another 30 minutes or until I find myself running low on supplies!
I can’t stress this enough. Your hands start to shake, and it becomes difficult, even painful after a while, if you try for too long without stopping – which is why we should all take breaks from our projects occasionally!
Here are some additional major events that will take place when you take more breaks between intensive tiny painting sessions:
- Breathing is key to painting. When you’re working on a detailed piece, your brain and muscles must have enough oxygen so they can keep doing their jobs without getting tired or stressed out from holding their breath while focusing intensely on the model before them. Inhaling deeply helps by filling up those lungs with fresh air, which feeds into our bloodstreams!
- Painting is a delicate process, and you should take breaks to allow your hands, arms, and fingers to rest. After painting for long periods, it’s easy to hold onto our tools with an iron grip because this will stiffen them out even more than they were before! So when in doubt – lighten the pressure on those brushes by letting go from time to time 🙂
Step 3: Use a Larger Brush if Necessary.
The right tools are essential for painting miniatures well. The way you use your brush is more important than what kind or type of brush it may be, as practice will make perfect! I have a few favorite brushes that helped me learn the ropes when first getting into this hobby; if yours isn’t working quite as they should, try using these tried-and-true technique starters instead.
The careful painter is better than the hobbyist. It’s not about how much cash you throw at painting; it’s all in your time with the brush-and that will tell anyone who really knows their craft which one of us was born to do this work!
So why does a larger brush provide better detail painting? It may sound counterintuitive at first, but the bigger bristles offer more control and precision for even those tiny details. For example, if you’re looking to paint some intricate miniature paintings with lots of fine lines, then this is your best bet instead of something like an old-school round-brush that could easily miss what you were trying to capture!
I always keep my hands full with brushes. I’ve found that larger ones, like The Army Painter “Regiment” brush, are great for general work, but if you want to really give it your all, then higher quality Kolinsky sable should be used!

Brush up on your brush strokes, and soon you’ll be painting like a pro! Princeton Aqua Elite watercolor paint brushes are made out of synthetic Kolinsky Sable that won’t leave any streaks in your work or disappoint when you’re trying to bring shapes into focus. There is no need to worry about bristles collapsing with these sturdy brushes, so go wild with color!
A too-small brush may look like it can help you paint details; when in fact, it’s actually the worst thing. Here’s why:
- Painting details often means slowing down, which can be difficult if you’re trying to paint with a brush that doesn’t hold much paint. For example, small brushes with short or narrow bristle tufts will only let out very little of what’s on your palette, making it hard for the user to finish their work in time.
- If you’re looking for the best way to give your miniatures that perfect detailed look, use a larger brush with an extra-pointy tip. A brush with good paint holding ability and can maintain its fine point even when dry will help make those intricate shapes more easily than if they were drawn by hand first!
Winsor & Newton Series 7 Kolinsky Sable MiniatureMore Details
The #2 brush is perfect for detailed work like painting miniatures. This includes the highly skilled, such as freehanding or blending on small surfaces of swords and armor when not using metal paint (NMM). If you want good eyesight with a natural capacity to do your finest detailing, then I recommend picking up one Winsor & Newton Series 7 miniature size artist brushes instead!
Step 4: Thin Your Paints (But Not Too Much)
If you want to improve your detail painting skills, the most important thing is how much paint will come off of my brush. I can control this by using various techniques and tools that help me achieve what’s required in any situation – whether it be an area where coverage is needed or just highlighting specific areas on models like they’re wearing armor!
Painting models with thick paint is a recipe for disaster. Not only does it obscure the detail, but you may end up making mistakes on areas that were previously painted because of its sliminess and icky feel in your hand!
To thin your acrylic paint, I recommend using water. It’s the best way to keep most of its properties intact, and it’s free! Plus, you can clean up easily with a few squirts from those handy-dandy tap handles on every corner here at home base camp for artists everywhere 🙂
When painting small details and areas, you only want to add enough water to evenly disperse the pigments. However, this doesn’t mean they become runny because then we would just be wasting our time! For these types of jobs – just one drop should do it perfectly fine.
Now, for really fine details or freehanding: If you want to paint in a more detailed manner, I suggest that when adding on top of colors, use multiple thin coats rather than one thick layer. It is important not only with this technique but all painting jobs (even if it’s just watercolors) go slowly and carefully while still working quickly enough where there won’t be any runs!
Always start with a thin layer of paint and add more gradually, so you don’t get any drips. Adding water will make it easier to paint details, but be careful because too much can cause runs if done incorrectly
Step 5: Use a Dry Palette
It may be controversial, but if you’re really looking to paint the details on your miniature accurately and with precision, then I say don’t use a wet palette.
For those who think that a wet palette is the best tool to improve one’s miniature painting skill, I’m sure you’ll find this blasphemous. It does have its place in any painter’s kit, though, and can be used for mixing paints as well as keeping them from drying out or even helping with thinning (see review).
On the other hand, wet palettes have several notable limitations. You need to maintain a wet palette and make sure it’s clean from mold since any excess moisture will seep into your paper which can lead to paint getting too thin or hard-to-control depending on how much water they absorbed (the more you use). The proper technique for working with one is very different from using oils as opposed to acrylics because they’re so susceptible when exposed this way – but also offers some unique advantages if done correctly!
Painters who don’t use a dry palette may find it challenging to understand the behavior of paint when in its natural state. However, I would argue that if one were ever going to experiment with different types and techniques, then learning how an unmoistened piece acts differently than those on water or fully mixed together can teach you many things about painting!
A small ceramic watercolor palette is the perfect all-inclusive tool for mixing and thinning acrylic paints and detailed miniature painting.

Jack Richeson’s porcelain mini mixing tray is a great starter set for beginners or an affordable gift for those just getting started in the art industry. Mixing ink, water media, and dyes couldn’t be easier. It works as a palette to mix colors and a platform to create expressive artwork that won’t smudge!
You can’t paint details on minis if you don’t know how paint behaves. A dry brush is essential for understanding this dynamic and getting better at mixing colors, thinning paints in your palette (and avoiding overthinking), loading the bristles fully before application. They are less likely to skip or streak when working with projects.
When painting detailed parts of your model, don’t waste time with paint that you can’t predictably control. A dry palette will simplify the variables and focus more on what needs to be done in front of you: application!
You can improve your control over paint with a dry palette. Dry palettes are better for detail work!
Tips: How to Paint Small Details
If you want to paint small details, there is a lot of information you can find on the internet. Here are some tips for painting small pieces:
- Sometimes, applying a thin coat is better than using a thick coat of paint to your details. If this is the case, apply one continuous thin jacket, followed by another light coat.
- You can also work with a sponge to apply details in soft colors. Sponges will help you create textures and shadows in your model.
- It’s important to remember that if your detail layer is underneath a layer of gesso or primer, you might need more layers to cover it up completely.
- When working with sponges, you can use the back of a paintbrush to remove some excess paints. This technique is perfect if you want to create colors gradients.
Conclusion
I’ve been painting miniatures for a long time as both hobbies and commissioned painter. I’ve tried many techniques, but when it comes to fine detail work, there will be times where your skills plateau- improvements happen more slowly than they did before or after this happened. You might think that all of the tools you’re using are responsible for this stagnation in progress; however other things can help too!
To summarize, here are 5 ways to improve miniature detail painting:
- Maintain a good body posture at all times
- Take painting breaks
- Use a larger brush
- Thin your paints (but not too much)
- Use a dry palette
The science of painting miniatures is an ever-growing field, with many new discoveries being made every day. More ways to improve your precision include advanced brush handling skills and surface preparation techniques like mold line removal or gap-filling for a perfect finish on any model, no matter how big it may be!

Hey there! I’m Richard Baker, a miniature painter who’s been in the game for a solid decade now. I’ve been painting miniatures for ten years and I’ve got a ton of tips and tricks to share with you all. My website is a treasure trove of knowledge that I’ve gathered from both my own personal experiences and from reading all sorts of books.


Leave a Reply