Hey there fellow mini painters! Today we’re going to dive into the world of zenithal priming and find out just what the heck it is and how to do it. But first, let me tell you a little story about my first time using this technique.
I was a young and eager painter, full of hope and dreams of creating the most beautiful and lifelike miniatures the world had ever seen. And then I tried zenithal priming for the first time. I was like “What the?! This is way harder than I thought it would be.” But, after a bit of practice and a lot of patience, I finally got the hang of it and let me tell you, it was so worth it!
So, what exactly is zenithal priming? It’s a technique that was popularized by the likes of Van Dyck, Rembrandt and other famous painters, which creates the illusion of depth in your miniature paintings. It’s all about the way the light hits your miniatures and how the primer is applied.
What is Zenithal Priming?
Zenithal priming in miniature painting is a technique where you paint shadows and highlights without using washes or filters.
What does this mean?
It means that your paints go from dark to light, with the lights hitting parts of your model directly facing upwards, while the darks are painted underneath these areas – so on those surfaces facing downwards towards you. This creates depth by adding shading and highlighting within one coat of paint instead of multiple layers (which can be time-consuming).
The idea is not new but has been adapted into many different techniques over the years depending on what people have wanted out of their model and how fast they want it done; I’ve found my own method, which works for me best when speed painting armies quickly.
How does Zenithal Priming Works?
Zenithal priming in miniature painting is a technique where you paint shadows and highlights without using washes or filters. This gives the miniature more depth, definition, and realism by creating contrast between lighted areas of the mini and shadowed areas, which are darker than just flat black primer.
This is done with thin layers of paint that gradually build up from dark to light tones as they approach what would be considered midtone if painted normally. The thinness allows for subtle variations in tone on raised surfaces while keeping them smooth enough not to look bumpy or wrinkly when painted over with washes or dry brushing later on. It takes time, but your minis will have better-looking skin coloration (i.e., rosy cheeks), clothing gradients, and more realistic metallic surfaces with a little practice.
The basic idea is to thin layers of paint from dark colors (i.e., black) to midtones (like green or yellow) until they reach the lightest tones like white which should be thin enough that it’s almost clear but glistens as if wet when seen indirect lighting conditions on the miniature surface itself. This technique works best for metallics, reds/pinks, purples, browns/greens/yellows…basically, any color except blues since thinned blue mixes tend to get too chalky looking after several thin coats are applied evenly over a large area without some shadowing provided by the darker thinned coats over the raised areas.
The procedure is made up of only three simple actions:
- Dab a small amount of paint on the entire model black (or any other color you wish to use as a foundation).
- Spray a 90-degree cone from the top, using grey (or any other color, but not as light as before). Try to apply thin layers rather than spraying too much.
- Starting from the top, spritz in a 45-degree cone with white paint (or a more brilliant color than used in step 1). Remember to apply several layers.
Why Should I Use Zenithal Priming?
Zenithal priming can greatly improve the look of your miniature painting by:
- Reducing the number of layers you need to paint. For example, if you’re going for a black and white theme with no highlights or shadows.
- Saving time. Why paint highlight colors after shading when you can do both at once? This is particularly useful when working on large armies and don’t have much free time in general!
- Providing more contrast between paints, so they pop out better against each other. You will get less “muddy” looking results this way versus layering up washes over dry brushing (though it’s good practice to layer some washes too occasionally!).
The Process Of Zenithal Priming
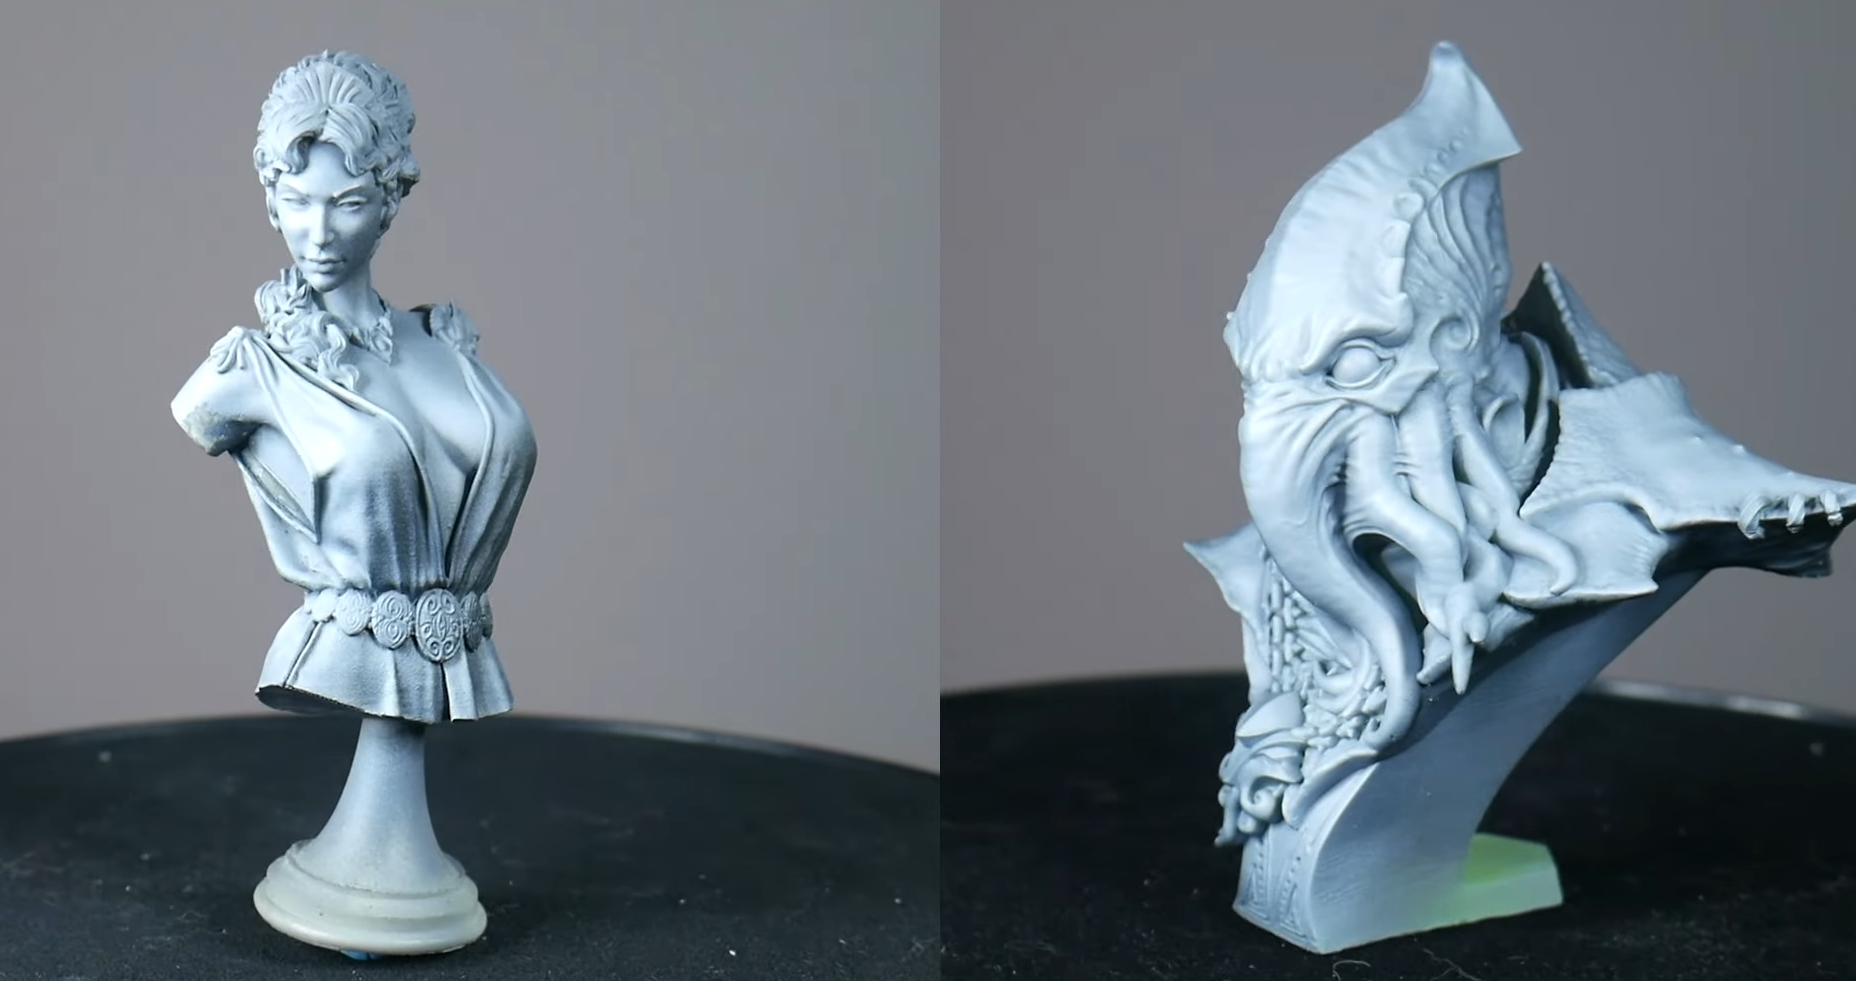
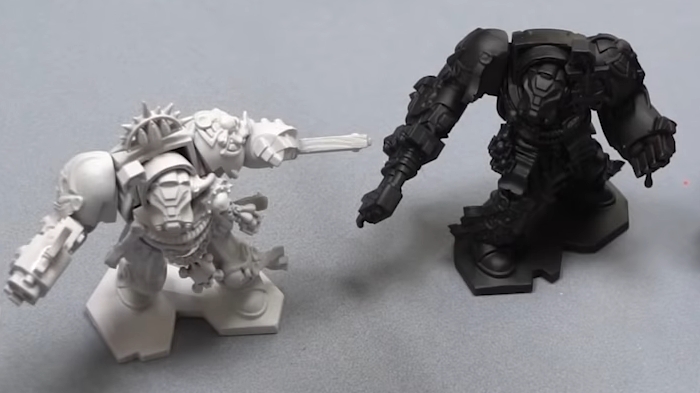
Step One: Prime it Black
The first step in the Zenithal Priming journey is to apply a high-quality, all-black base coat. As my tests have shown, the use of cheap, low-quality spray paint will compromise the final result. Therefore, it’s essential to opt for a quality brand that ensures a smooth, even coat.
To make this process more efficient, consider these tips:
- Mount your miniatures: Attach the miniatures to a thin board using mounting tape. This allows for easy maneuvering during the priming process.
- Batch prime: If your board is long enough, you can prime multiple miniatures at once, saving valuable time.
Step Two: Spray it Grey
The next phase in the Zenithal Priming process is to spray the miniatures with a grey primer. Instead of moving the miniatures around, position yourself above them and spray downwards in a 90-degree cone, applying a single layer.
This method aims to cover the tops and sides of the miniatures with grey, without reaching into the recessed shadow areas or touching the undersides. After I put this technique to the test, I discovered that it creates a dynamic, more natural-looking shadow effect.
Step Three: Spray it White
Through experimentation, I found that the most effective highlight comes from spraying a layer of white paint from directly above the miniature. If you’re using an airbrush, focus the spray on the head and shoulders, applying minimal paint to the sides.
Consider these additional tips for this step:
- Seal your models: Protect your work by sealing your models before playing.
- Extra color: For miniatures that require an additional color, such as the factions or monsters in Cthulhu Wars, you’ll need to add another step.
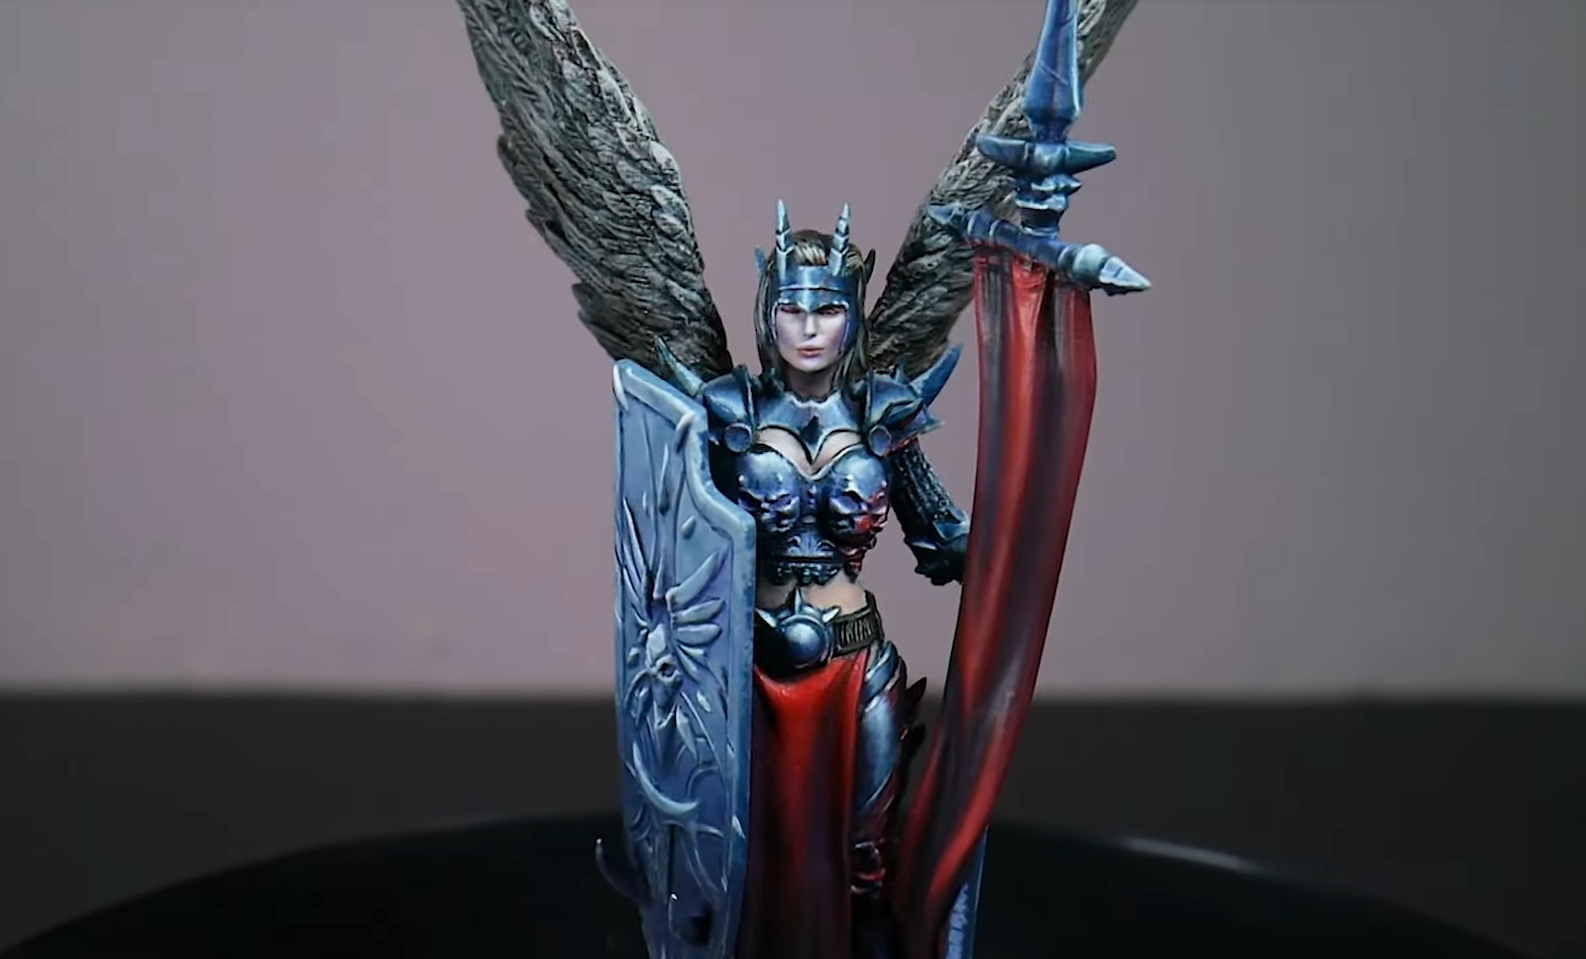
Step Four: Color Wash
The final step in the Zenithal Priming process is to add a color wash. My practical knowledge suggests using quick shades for this step, but thinned paint in the corresponding color will also work. Red for red miniatures, blue for blue, and so on.
When applying your color wash:
- Use an airbrush if possible: This tool can distribute the liquidy paints more effectively.
- Don’t forget traditional brushes: Traditional brush-on washes also provide excellent shading effects as they flow into the nooks and crannies of the miniature.
Prime Your Miniature in Black or Dark Grey
The Impact of Experimentation
Through my journey of experimenting with miniature painting, I’ve discovered that the colors you prime with can profoundly influence the final appearance of your miniatures. You can achieve some interesting results by mixing paints that aren’t necessarily black or white.
Consider the following color options for unique effects:
- Dark Blue: Ideal for creating an alien or otherworldly effect.
- Green: Can make your miniature seem as if it’s lurking in a dense jungle.
However, regardless of the color chosen, based on my practical knowledge, it’s crucial to avoid getting these colors into the recessed areas of your miniature. Here are some helpful tips:
- Always start with a smaller brush to have better control over the paint.
- Use a gentle touch to avoid getting paint in the wrong areas.
- Practice makes perfect. Always do a test run on practice miniatures before applying these techniques to something valuable.
The Zenithal Priming Technique
One method that has consistently proven to be effective in my findings is the Zenithal priming technique. It provides a realistic guideline for highlight and shadow placement, making it an invaluable tool for both beginner and experienced painters.
Here’s a step-by-step guide on how to apply the Zenithal priming technique:
- Black/Dark Primer Base: Start by spraying your miniature with a black or dark grey primer from all angles. This ensures that all parts of the miniature are covered and creates deep shadows.
- Grey Primer: Next, spray a grey primer from a 45-degree angle. This will hit the areas that are typically hit by light, but not the deepest recesses.
- White Primer: Lastly, spray a white primer directly from above. The white paint will naturally fall onto the highest points, the areas where light would naturally hit.
Zenithal priming is particularly useful if you’re still learning or have issues with paint chipping away from washes. It’s also effective in situations like dry brushing, where the layers of color are so thin that they can easily wash out, yet not thick enough to create a build-up effect.
The Synergy of Zenithal Priming with Other Methods
The true strength of zenithal priming lies in its compatibility with other painting techniques. It works hand in hand with a pre-shading method, influencing the hues of the applied layers and creating a more dynamic effect.
For example, paint applied over a black primer will appear darker than that applied over a white primer. Conversely, if you’re using a transparent or semi-transparent paint, the zenithal priming beneath it can create an automatic gradient, adding depth and volume to your miniature with less effort.
Here are a few tips to maximize the effects of zenithal priming:
- Keep your paint layers thin and semi-transparent to allow the zenithal primer to show through.
- Use a wet palette to keep your paints thin and workable for longer.
- Consider using inks or glazes for their transparency to really make the most of your zenithal undercoat.
Airbrush vs. Spray Can
Spray cans are not a great solution to making painting miniatures your regular hobby. They work well for those who have leftovers from spray paint and do not want an airbrush, but they will be much more difficult to use on smaller areas of models like faces or hands if it is the other way around. I started with them because I could never thin paints enough for my airbrushes, so instead used what was already available in our household (I’m sure most households probably own at least one).
Once I got some Vallejo Airbrush paints, though, that’s when everything changed as now there were no longer any issues using either type of paint (spray can vs. traditional)
Airbrush
A popular type of paint for airbrushes is brush-on primer. It only requires a little bit to get up and running since you pour it from the bottle into a cup before using it.
- It can be used as an all-purpose primer for models of different materials and scales.
- You may use an airbrush indoors
- Sprays on the paint more evenly and smoothly
- Smaller risk of paint pooling up in the crevices on the miniature
- Easy to clean up if you make a mistake
- Cleans up with water
- Consistent paint coverage
- Quick and easy to use
- It isn’t as messy when you are handling the liquid primer.
- It takes a long time to dry.
- Requires proper ventilation when you are using it indoors
- It can be difficult to get the paint off your skin and clothes
- It might require a respirator if you are using it indoors
- It can be difficult to get the paint out of your airbrush.
Recommendation
Airbrushes are a versatile tool that can be used for many projects outside of zenithal priming miniatures, so you’re more than likely going to get good use out of it.
Here are my top airbrush kits.
Spray Cans
Spray cans are an alternative to airbrushes when painting. They can be used for the same purposes and may produce similar results.
- It can be used on all materials and scales
- Spray cans are inexpensive and convenient
- They’re simple to use
- They’re great for beginners
- Cans are easy to store and transport.
- Harder to control
- It can be messy if they accidentally spray onto the miniature or person’s hands
- wide spray range means you don’t have to be quite as precise
- It can take longer than using an airbrush for the same project.
Recommendation
If you have a lot of miniatures lying around, why not use them as decoration? The Rustoleum Painter’s Touch 2X Spray Paint in black is recommended for the project. If you want to paint your minis with white instead, we’d recommend getting that version too – it doesn’t matter if there are two cans or just one. This spray paints a low odor and dries within 20 minutes, so indoors shouldn’t be much trouble!
Conclusion
After extensive analysis and experimentation, it is incontrovertible that zenithal priming is an exceptional and indispensable technique for any miniaturist seeking to master highlight and shadow placement. One might even go so far as to say that it is the quintessential technique for achieving nuanced and dynamic contrast in your miniature painting. Furthermore, it is worthy of mention that the use of alternative colors, beyond the conventional white or black, when executing this technique on a black or dark grey base can yield surprisingly delightful and enthralling results. Thus, it behooves every discerning miniaturist to explore and experiment with the boundless possibilities of zenithal priming, both as a technical foundation and as an expressive medium for your miniature painting.
FAQs
What models work the best with Zenithal Priming?
When using zenithal priming, the model shouldn’t be too large or small. Make sure it’s a standard size and has details that will show up after you have primed them.
Can you use spray can primer to zenithal prime?
Yes, you can use spray cans to do zenithal priming. Just make sure the paint doesn’t pool up in holes or recesses where it shouldn’t be going.
Is there a difference between airbrush primer and spray can primer?
Both types of prime have advantages over each other depending on what your needs are. Spray cans tend to be more for smaller models that need precise coverage but aren’t used as much when working with large pieces since they take longer to dry; meanwhile, airbrushes cover larger surfaces faster because of their size, so they’re better suited for bigger projects.
Can either one get into small crevices?
Yes! The key is just using the right tools for the job and being thorough if you’re using an airbrush.
How long does zenithal priming take?
The time it takes will vary depending on the model size and how much work you are putting into the process, but usually, it shouldn’t take more than a few hours at most. If you’re taking your time painting each color of primer on different parts of the model, then expect to do some serious waiting around for things to dry. You can speed up this process by giving certain areas multiple coats or spraying them all at once. Either way, make sure that whatever primer you use is compatible with your project before getting started!
How to quickly paint miniatures zenithal priming and army painter shades?
There are a few different techniques when it comes to painting miniatures, which are outlined below:
- Zenithal Priming (by hand) involves using an airbrush to lightly spray one color over all parts of the model. Then, you take another similar color but darker and repeat the process, this time focusing on areas like shadows or crevices. Finally, you go back with your darkest shade and add even more dark details until everything looks the way you want it to. This process can be sped up by adding multiple coats, depending on the paint combination you’re using. Keep in mind that this method takes longer than others, as there will be many colors involved, as opposed to just black primer followed by white, gray, and black again.
- Ice Tinting is a technique where you take a very light blue (or any other color, depending on the effects you’re going for) and spray all of the parts that need to be highlighted. Then, like before, you use a darker version of the same color, but only focus on certain spots where shadows will go, using your airbrush or paintbrush as necessary. Finally, you finish things off by adding small amounts of pure white until you reach the desired brightness level. This method works well since there are no harsh lines between colors, so if something happens during painting, you can easily blend them without much effort required.
- Army Painter shades are specifically designed to provide a quick and easy way to paint miniatures. Unlike regular shades, they are formulated to be highly pigmented, which makes them easier to use and allows you to achieve the desired effect more quickly. Whether you use zenithal priming or ice tinting, incorporating army painter shades into your painting process can help you save time and achieve the desired results more easily.
How to paint miniatures zenithal priming quickly?
The fastest way to get your miniatures ready for painting is by using “Speed Painting.” This method involves priming the model with black paint, going back in and doing small touch-ups with white until you’re satisfied with how it looks. Then finish things off by taking a color like blue or red (depending on what kind of look you want) and dry brushing all over the parts that need highlighting before adding some smaller details here or there, such as eyes or symbols if needed. After everything has been assembled, go through again and add even more highlights where necessary, so they stand out better than before! With this technique, it’s best to start simple since touching up colors can take longer than just starting fresh from scratch, especially when working on larger models.

Hey there! I’m Richard Baker, a miniature painter who’s been in the game for a solid decade now. I’ve been painting miniatures for ten years and I’ve got a ton of tips and tricks to share with you all. My website is a treasure trove of knowledge that I’ve gathered from both my own personal experiences and from reading all sorts of books.


Leave a Reply